Rather than buying carbon forks and plonking them on my new bike, I really had to build my own.
The fork crown and dropouts were relatively easy using the method for forged carbon lugs I’ve been developing for a while now. For the blades/legs however, aluminium extrusion wasn’t readily available in the shape I wanted (~15 x 40mm), so this was a great excuse to build hollow carbon blades.
Hollow parts like these are usually built using pre-preg carbon fibre and cured in an oven under vacuum. Pre-preg carbon fibre is expensive, a little hard to come by, and vacuum bagging uses a lot of consumables which I’d rather avoid. So I set about developing a more resourceful method to build these using more accessible materials and methods (woven and uni-directional carbon cloth).
Starting with a bike inner tube with a carboard mandril inside, the carbon weave (a combination of 200 GSM plain weave and 300 GSM unidirectional) is wet out and wrapped around the inner tube. This layup went in a 3D printed split mould, the ends plugged, and the tube inflated to 50 PSI while the epoxy cures.
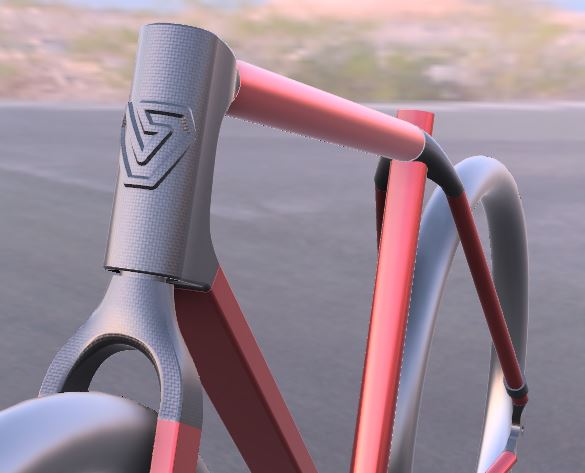
After having built all the lugs and the two blades required, it was then time to assemble the forks. Using a 3D printed jig to keep everything on the straight and narrow, the fork crown (with steerer tube already incorporated during production of the part) was bonded to the two dropouts and a separate brake post. Aluminium washers and an axle thread were finally glued in to the dropouts. Once clear-coated, the finished forks weighed in at a grand total of 600g. So not the lightest when compared with carbon road forks, but not too shabby for a first run at custom built gravel forks! For comparison, most suspension forks will weigh a little over 2kg.
Split moulds and start of the layup process for building fork bladesCarbon layup and inner tube set up in the mouldInner tube inflated and left at 50 PSI while the resin curesOne fork blade coming out of the split mouldStarting to build the fork crown (split mould, steerer tube, fork blade plungers)Building the forged carbon fork crown. Note the presence of continuous fibres to strengthen the area surrounding the steerer tubeLugs and blades in jig ready to be glued up‘Dry run’ of the forks on the front wheelForks finished and clear-coatedForks installed on the ‘Peacock’. Note there’s a little cable management yet to be done.
Let’s talk about forged carbon fibre! This material is made up of short carbon fibre strands (10 – 15mm long) in an epoxy matrix. The carbon fibre and epoxy is loaded into a mould and put under pressure so that it moves and conforms to the shape of the pre-determined geometry.
The geometry can be defined in a number of ways, but I do this by designing parts in 3D, then generate a female mould to define the exterior, and finally make male parts to act like pistons to compress the material and squeeze out any air. When the epoxy cures, you have a part which can be as strong as an identical part in aluminium, but only half the weight. Take a look at this video by Easy Composites; these guys have some incredible content which explains it all really well. They have some other videos on the subject, but this one here is one of the best as it investigates the strength of this material.
Carbon fibre parts are usually thin shells made up using woven carbon fibre cloth, but this approach means solid parts which would usually be reserved for complex machining such as 5-axis milling which can be very expensive and inaccessible. Instead, I’m using a 3D printer to build moulds, which means anyone build parts like this with very limited startup cost and easy to access tools and materials.
How about an example? The two images below show a fork crown I built for my first frontloader cargo bike. It isn’t the best example of how I would do it now, but it does show how the combination of moulds contribute to building the final part. I’ve since learnt a lot about designing parts to be easy to release, and consequently make the moulds last much longer.
Here the fork crown can be seen in black, the back half of the female mould is in grey/white (front half removed for clarity), and the plunger/pistons (male part of the mould) are in green. They get driven up into the mould to compress the carbon fibre/epoxy mixture.
Here the finished fork crown can be seen fitted with a steerer tube and forks installed.
Another advantage to forged carbon fibre is the ability to easily add more material where necessary to enhance the strength of parts. Another simple and extremely effective way of increasing the strength of parts is by including continuous reinforcement in select locations. For example, in the fork crown pictured above, I’ve wound continuous strands of carbon fibre around the cylinders where the forks and steerer tube meet the part as this is where a lot of the stress is concentrated. This is all built into the part as it’s loaded with fibre, doesn’t add any additional weight, and can be very simple to do.
The next step in the process of frame building using this method is to de-mould the part and tidy it up. Once you’ve made all of the lugs required, it’s now just a matter of gluing the frame together! To glue the carbon lugs and aluminium together, I’ve been using G-Flex 650-K epoxy by West System as it’s specifically made to be more elastic than most other forms of epoxy. This means it can better accommodate the stress of expansion/contraction between the two dissimilar materials. This epoxy seems to be going ok, but I plan to test it a lot more in future. If you have any thoughts/ideas on this, including an alternative, please do get in touch 🙂
So the end result is a frame built from carbon fibre lugs and aluminium extrusion, although any material could be used for the straight sections, be it steel or titanium etc. Below is some pictures of the first frontloader cargo bike I built using this method in September 2022. It’s built utilising an existing bike for the majority of the frame, but the front wheel is pushed forward (and made much smaller, it’s 24″) to make room for a large cargo bin. The design isn’t perfect, in fact there’s a heap of things I would change about it, but there’s also a load of things that I’m really proud of. Take for example the cable-actuated steering. It’s been a great test platform for working out the finer details in cargo bike design such as steering geometry, weight distribution, wheel base etc.
I hope you enjoyed the article. From here I’m developing a gravel bike built from scratch to better showcase the construction method and show others how incredible it is, so watch this space for an update on that!